Sunday, September 16, 2012

Cedar Plank Salmon

This Labor Day weekend was great! Ryan and I didn't have any travel plans and actually had down time to catch up on things. The only "thing" on our list was to pull out the grill! Although we both love seafood, we don't eat it a lot because it can be pricey. But while I was at Whole Food's over the weekend, I ventured past the seafood counter and noticed some fine-looking salmon on display! Fresh caught, and in-season.
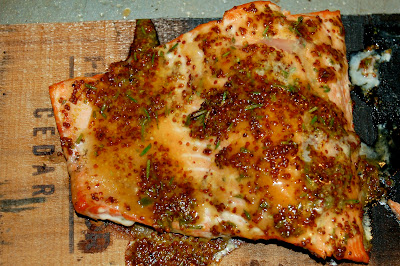
Cedar Plank Salmon | www.kettlercuisine.com

I always like to talk to the vendor behind the Whole Food's seafood counter, mostly because they are VERY knowledgeable about fish and always have great suggestions for preparation and recipes. However, this time, I knew exactly how to prepare it - Cedar Plank style!!

Cedar Plank Salmon | www.kettlercuisine.com

Cooking salmon on cedar planks is just one of those meals that Ryan and I both LOVE - kind of like the buttermilk-brined pork chops. It is delicious every time! And I have to admit, Ryan doesn't cook that much, but the man is good on the grill! I know that Dave is smiling down with a proud father grin when I say this :)

Earlier this year, I bought a few cedar planks and we attempted the salmon for the first time, playing around with a few different marinades/sauces. In all honestly, you don't need to have sauce or marinade at all with a cedar plank, but we found this easy combination of flavors to enhance the taste even more. The only "think ahead" note is, remember to soak the plank in water before placing on a grill, so it doesn't disintegrate into flames!

Cedar Plank Salmon Fillets 

Yields: 2 servings
Prep Time: 15 minutes + 1 hour soaking time
Cook Time: 15-20 minutes

2 (6 ounce) salmon fillets with skin
2 tablespoons dijon mustard
tablespoons maple syrup
1 teaspoon fresh rosemary, chopped
1 teaspoon lemon zest (reserve lemon for garnish)
Salt and pepper
Cedar Grilling Planks (soaked for 1 hour)

Place the prepared cedar plank into a large jelly roll pan and pour water on top to cover it. Put a large glass jar on top of the plank to keep it from floating.

Combine the mustard, maple syrup, rosemary and lemon zest in a small bowl and set aside.

Pull the fish out of the refrigerator and place on the counter for 10 minutes to bring closer to room temperature. Season with salt and pepper.

Heat a charcoal grill to medium-high heat (or indirect heating setup) and add the soaked plank to the grill rack, close the cover and heat for 3 minutes, then flip the plank.

Pull off the plank and place the salmon filets skin-side down on top. Generously brush the marinade on the fillets and cook on indirect heat for 7 minutes. (This is a great time to grill some vegetables for a side dish).

Move the salmon planks closer to the direct heat for 3-5 minutes until the fish is done (depending on thickness of filets.

No flipping necessary, but you can add more marinade while it cooks if you want - the plank adds a lot of flavor though.

Cedar Plank Salmon | www.kettlercuisine.com

Friday, September 7, 2012

Cherry Galette

There is nothing better than fresh cherries! And lucky for me, that is the only kind my husband will eat. (He refused to let me tell the story about how he indulged in an entire jar of Maraschino cherries when he was 10 which didn't end very well). Needless to say, he loves fresh cherries! 

Cherry Galette |www.kettlercuisine.com

Unfortunately cherries can be expensive, even when they are in season. So, whenever I find them at the market or grocery store for a decent price, I pounce! The other issue, especially at the grocery store is that the bags are large, so you end up with a lot of cherries. And what should one do with all these cherries???? Cherry Pie! 

Cherry Galette |www.kettlercuisine.com

The determination was there, but the time wasn't. I didn't have time to make all that crust (top and bottom layer). So, a cherry galette was born! 

Galette is a fancy alternative to a pie.  They are also great for using up fresh fruit, and making a small dessert for just the two of us. 

As we say farewell to cherry season, treat yourself to one last "hu-rah" with this recipe. Let me know what you think of these galettes!

Cherry Galette with a Hint of Lime

Adapted from Cooking Light
Yields: 6 servings
Prep Time: 30 minutes
Cook Time: 25-35 minutes

1 pre-made or homemade pie crust
4 cups of fresh cherries, pitted
1/2 teaspoon lime zest
3 tablespoons sugar, divided
1 teaspoon corn starch
1 tablespoon buttermilk
tablespoon turbinado sugar (raw sugar)

Whipped cream for serving

Start by pitting the cherries and placing into a bowl. Stir in the lime zest and 2 tablespoons of the sugar. Mix well and set aside for 30 minutes. Meanwhile, remove the pie crust from the refrigerator and lay on the counter.

Cherry Galette |www.kettlercuisine.com

Preheat the oven to 400F. Roll out the pie crust to a 12 inch diameter crust. Line a baking sheet with parchment paper and place the prepared pie crust onto the paper. 

In a small bowl, whisk together the cornstarch and the remaining 1 tablespoon of sugar. Sprinkle this on the crust, leaving a 2 inch border. Drain the cherries of their juices and place in the center of the pie crust, leaving a 2 inch border. Fold the dough border over the cherries, pressing gently to seal. Brush the edges of the dough with buttermilk and sprinkle with the turbinado sugar.

Cherry Galette |www.kettlercuisine.comCherry Galette |www.kettlercuisine.com

Bake in the oven for 25-35 minutes until the edges of the galette are golden brown. Remove from the oven and cool to room temperature until ready to serve.

Cherry Galette |www.kettlercuisine.com

The small amount of lime zest is a fantastic addition to the flavor. Lemon could also be used in place of lime. 

Serve with a dollop of whipped cream or vanilla ice cream!

Monday, September 3, 2012

7-Layer Bean Dip

Football Season - a time for excitement, disappointment, camaraderie and a lot of yelling. Unfortunately, it is also a time for very unhealthy foods! Since my Crohn's doesn't usually let me indulge in anything cheesy, fried or creamy, I usually always volunteer to bring something myself. And one of my favorite crowd pleasers, that happens to also be a waistline pleaser, is my 7-Layer Bean Dip. 

All you need to do is dedicate a little bit of time and make a few substitutions, and you can make your own easy layer dip that doesn't include all of the calories. 

7-Layer Bean Dip | www.kettlercuisine.com

I thought this would be a perfect addition to the Live Draft Party for my all-girls-fantasy football league. Why should the guys have all the fun???

All the gals brought something over to our friends house, where we setup our computers for draft time. There was a lot of yelling, cursing, a few drinks here and there, and some very good food. Katie decided to make these yummy bits (Oreo Cheesecake Pretzel bites....remember the Chocolate Peanut Butter ones)??

And the table was filled with delicious food from everyone's kitchens.


7-Layer Bean Dip | www.kettlercuisine.com

We put on our jersey's (paused for a very girly picture) and got down to business with the draft. 


The great thing about this dip, is that you can make several layers ahead of time and assemble right before the party or get together. The best way to keep this healthy is to make your own bean layer instead of the mystery refried beans that come from a can.

Here is the layer breakdown:

Layer 1 - "refried" black beans - by starting with whole black beans and adding healthy coconut oil and spices, it cuts back on a lot of the fat
Layer 2 - guacamole made with just avocado and salsa
Layer 3 - light sour cream
Layer 4 - salsa (fresh or your favorite brand)
Layer 5 - sharp cheddar cheese - since there is no melting in this dip, use a sharp cheese and less of it
Layer 6 - fresh chopped lettuce - for a little health benefit
Layer 7 - fresh chopped tomatoes - for a little extra health benefit

7-Layer Bean Dip | www.kettlercuisine.com


7-Layer Bean Dip

Yields: 8x8 dish of dip
Prep Time: 30-45 minutes
Cook Time: 15 minutes

1 Tablespoon oil (coconut or olive)
1 (15.5 ounce) can of black beans, drained and rinsed well
1/4 cup onion, finely chopped
1/2 teaspoon chili powder
1 teaspoon cumin
1/3 cup vegetable broth
1 avocado, mashed
Salsa
Light sour cream
Sharp cheddar cheese, shredded
Romaine lettuce, finely chopped
2 roma tomatoes, chopped
Fresh chives, chopped
Tortilla chips

Start with the bean layer. In a large saute pan over medium heat, warm the oil and saute the chopped onion for about 5 minutes. Stir in the cumin, chili powder and pinch of salt until well combined. Add the black beans and stir to warm up. Stir in the vegetable broth and bring to a simmer. With a potato masher or back of a large spoon, start to mash the beans in the pan. Continue to cook on medium-low heat, stirring and mashing along the way, until the mixture has thickened. Another method to "mashing" the beans is to place them into a food processor. Set the beans aside to cool.

Make the guacamole to your preference. We like to simply mash the avocado and mix in a little of our favorite salsa. Set this aside. 

Once the bean layer has cooled, get ready to assemble the dip. Spread the bean mixture in the bottom of an 8x8 glass dish (or dish being used for the dip). Then spread the guacamole on top of the beans, being careful not to blend them. Next, spread a layer of sour cream, then salsa and shredded cheddar cheese. Place this in the refrigerator until ready to use.

Layer the shredded lettuce and chopped tomatoes on top of the dip right before serving. Garnish with chopped fresh chives.

Serve with your favorite tortilla chips and enjoy!!


7-Layer Bean Dip | www.kettlercuisine.com