Showing posts with label healthy. Show all posts

Friday, July 10, 2015

Chicken and Shishito Pepper Kebabs

One of my favorite little gems have started appearing at the market - shishito peppers. These sweet peppers may be small, but they pack a huge flavor punch. I tasted them for the first time last year, trying a few different preparation techniques. They are pretty versatile, like a bell pepper. Since last year, I have noticed that they are popping up in a lot of grocery stores now as well. The easiest way to cook shishito peppers is to sauté them in a hot cast iron skillet with oil and coarse sea salt. However, since it is grilling season, I figured a nice kebab was in order!

Chicken and Shishito Pepper Kebabs | www.kettlercuisine.com

I like chicken kebabs since they hold up well on the grill and won't overcook by the time the vegetables are done. I decided to marinade the chicken a bit to add some additional flavor and the Hubby gave me the exact cooking instructions! If you include lemon juice in the marinade, be sure to NOT let it sit for too long. The oil, herbs and garlic make a great marinade as well though if you want to get a more flavorful kebab. Just drizzle the lemon juice on the kebabs before grilling.

If using wooden skewers, remember to soak them in water for at least 30 minutes before putting on the grill.

So head to your local Farmers Market in search for these sweet little gems and fire up that grill ya'll!

Chicken and Shishito Pepper Kebabs | www.kettlercuisine.com


Chicken and Shishito Pepper Kebabs

Yields: 4 servings
Prep Time: 30 minutes
Cook Time: 10 minutes


1 pound chicken breasts (skinless, boneless) cut into 1 inch cubes
1 pint Shishito Peppers
5 cloves garlic, minced
2 T Grapeseed oil or Olive Oil
2 teaspoons fresh thyme, chopped
1 teaspoon fresh lemon juice
Salt and pepper 

In a small bowl, combine the garlic, oil, thyme, lemon juice and salt and pepper and mix well. Add the marinade into a large zip-loc bag along with the chicken, mix around well. Refrigerate for 30 minutes. Prepare the grill for direct heat.

Skewer the marinated chicken and shishito peppers and grill in a single layer over direct heat. Cook the kebabs for about 5 minutes per side, covered, watching to not char the peppers too much. Remove the kebabs and let sit for 5 minutes before serving.

Chicken and Shishito Pepper Kebabs | www.kettlercuisine.com

Tuesday, July 7, 2015

Zucchini Noodle Salad

Summer produce is coming in strong at the Farmers Market. Tomatoes, peaches, peppers and, my favorite, zucchini. I became obsessed with making noodles from zucchini last year, or as I like to call "zoodles!" I never got around to posting this recipe last year, so I have been holding on to it for summer.


Zucchini Noodle Salad | www.kettlercuisine.com

Last summer, I had the opportunity to take a Farmers Market cooking class. The instructor, who is a fellow blogger and friend from I Cook, I Eat, It's Life took us around the Western Wake Farmers Market and introduced us to several of the vendors and farmers. I've since gotten to know several of the farmers, learned about their farms and tasted all of their goods! I look forward to my market trip every Saturday morning now :)

All the recipes that we made in the class featured produce and goods from the market like this Zucchini Noodle Salad which highlights the best of summer. I've mentioned my spiralizer before to make Sriracha Shrimp with Zucchini Noodles. I highly recommend getting one of these kitchen tools.

Zucchini Noodle Salad | www.kettlercuisine.com

I like to serve this with fresh slices of Heirloom tomatoes, herbs and Desirée's Balsamic Vinaigrette. Amazing how some of the most healthy dishes can feel like complete indulgences! At least, they do for me :)


Zucchini Noodle Salad

Yields: 4 side servings
Prep Time: 15 minutes + 30 minutes
Cook Time: 10 minutes


3 medium zucchini
1 large red pepper
1 small red onion
1 Tablespoon fresh basil
1 Tablespoon fresh parsley
Desirée's Balsamic Vinaigrette
Fresh tomato slices (optional)

Prepare the dressing first and set aside.

Cut the ends off the zucchini and julienne the vegetables or use a spiralizer (I like this one) to create noodles. Sprinkle the noodles with salt and line a large colander with paper towels. Toss the noodles and put in the lined colainder to help drain off some of the moisture. Set this aside.

Slice the red onion thinly and place in a bowl of cold water, set aside. (This helps to cut the bite from the onion since they are raw in the salad).

Under a high broiler, roast the pepper until the skin is well blistered. Remove from the oven and place in a covered bowl. Once the peppers have cooled, peel off the skin, deseed and chop. Here are more detailed instructions on how to prepare roasted red peppers. (Alternatively, use jarred roasted red peppers).

Place the chopped red pepper, soaked onion slices and fresh herbs in a large bowl and gently toss. Add in the zucchini noodles and drizzle some of the dressing over top. Toss gently and serve with more fresh herbs and dressing if desired. This salad is best served immediately, although I enjoyed the leftovers the next day too!

Zucchini Noodle Salad | www.kettlercuisine.com

Saturday, June 13, 2015

Fresh Start Green Smoothie

Fresh starts are a wonderful thing in life. Recently, this has been a consistent theme for me. I started a new job, switched to a new disease management regimen, and now, looking for a new house. Every "fresh start" comes with a defining moment - a job offer, a cookbook, a workout plan, a For Sale sign in your front yard. It signifies that there's change ahead, which to me is what keeps life fun and interesting.

Fresh Start Green Smoothie

Like in life, sometimes my diet needs a "fresh start." Cleanses and cleansing foods often symbolize this. I will be the first to admit that cleanse is a misleading word, often associated with week-long juicing, body scrubbing and cayenne-spiced waters that result in headaches, mood swings and several trips to the bathroom. They tend to be a bit much for my delicate system, so I stick to much shorter versions or simply just consume cleansing foods, like this green smoothie. 


I realize that I have taken a VERY LONG break from the blog, but with good reason (see list above). Consider this my fresh start! 

Fresh Start Green Smoothie

Fresh Start Green Smoothie

Yields: 1 smoothie 

1/2 avocado
1 pear with skin on
Juice from 1/4 lemon
Handful fresh spinach
1/4 teaspoon fresh ginger, grated
1/3 cup filtered water
10 mint leaves (can also use cilantro)
1/2 teaspoon honey (optional)

Add everything into a blender and mix at high speed for several minutes. Scrape down the sides if needed and continue to blend. Eat/Drink immediately for best nutritional value.

Sunday, March 22, 2015

Carrot and Sweet Potato Soup

Even though warm weather is coming...slowly, we are still at the tail end of Winter produce. Soup is the perfect easy dinner to keep me warm as the evening turns chilly. Using the carrots and sweet potatoes from the last of the Winter harvest makes for a perfect base for soup.

During the month of February, I was sick for probably 20 of the 28 days! It was a rough month, and soup got me through most of the sniffles, sneezes and freezing cold weather. As Spring approaches, I have a few soup dinners planned for the Hubby and I to keep us warm during the chilly nights.

Carrot and Sweet Potato Soup | www.kettlercuisine.com

I love carrots and always eat them. It seemed like an orange match made in heaven pairing them with sweet potatoes, another favorite vegetable. I first made this soup during one of the snow days in February. The Hubby loved it and I knew it would be the perfect dinner for the chilly nights ahead this week.

Carrot and Sweet Potato Soup | www.kettlercuisine.com

Carrot and Sweet Potato Soup 

Yields: 6-8 servings
Prep Time: 10 minutes
Cook Time: 30-40 minutes


1 onion, chopped
3 tablespoons butter
3 garlic cloves, minced
1/4 inch fresh ginger, grated
2 medium sweet potatoes, chopped
4-6 whole carrots, chopped
salt and pepper
1 quart organic low-sodium chicken broth (use vegetable broth if vegetarian)
1 large bay leaf
1/8 teaspoon coriander
1/4 teaspoon dried chili peppers
1/4 teaspoon dried thyme
lime wedges
maple syrup
fresh parsley, chopped


In a large, thick-bottomed soup pot, melt the butter over medium heat and sauté the onions until translucent, around 7 minutes. Stir in the garlic and ginger and sauté for another few minutes. Add in the sweet potatoes, carrots, dash of salt and pepper and continue to cook while stirring. After 2 minutes pour in the broth, bay leaf, coriander, chili peppers and thyme. Stir well and cook covered for 20 minutes over medium heat. Check to see if the sweet potatoes and carrots are well cooked and soft. If not, continue to cook for 5-10 more minutes.

Pull out the bay leaf and discard. Using an immersion blender, puree the soup until desired consistency. You can also use a blender to puree the soup (most likely in batches). Serve with a drizzle of maple syrup, fresh parsley and juice from a lime wedge, all to taste.

Carrot and Sweet Potato Soup | www.kettlercuisine.com

Sunday, March 15, 2015

Raab Greens with Sausage

After a month-long unintentional hiatus from the blog, I have racked up many recipes to share. Unfortunately, my Mac broke right after Valentine's Day, which basically means my lifeline to blogging had to be sent in for repair and I was left with many ideas and the old fashion pen and paper. Alas, I have been reunited just in time for Spring.

Raab Greens with Sausage | www.kettlercuisine.com

Today, I'm sharing a super easy recipe using raab. Probably the most common is broccoli raab, which is often referred to as Rapini. Raab is a cruciferous veggie, usually appearing as thin stalks and greens with little florets speckled throughout. I don't see types of raab in the grocery store very often, but it is all over the Farmers Market lately. 

Several farmers at the Market have offered different kinds in the last few weeks; chard raab, winter greens (brassica) raab and this week I found a mixture of mizuna and tatsoi raab. Thank you ColorFields Farm!

Raab Greens with Sausage | www.kettlercuisine.com

Raab can be, and usually is a bitter vegetable, which I know the Hubby isn't a huge fan of. However, with a little sausage, spice and acidity, it turns into a side dish that he goes back for seconds of. 

This recipe for Raab and Sausage is very versatile. You can use your favorite kind of sausage and whatever kind of raab you can find. You could even just use a bitter green like mustard or turnip greens. Sauté away!!

Raab Greens with Sausage | www.kettlercuisine.com

Raab Greens with Sausage

Yields: 4 side servings
Prep Time: 5 minutes
Cook Time: 3-5 minutes


1 bunch broccoli raab or other kind of raab or leafy green, roughly chopped
3-4 sausage patties or links
1/2 teaspoon red pepper flakes
1/4 cup water
salt and pepper
Olive oil
Lemon juice

In a large sauté pan over medium heat, cook the sausage and break into smaller pieces. Once the sausage is cooked through, remove to a paper towel lined plate, reserving the rendered fat in the pan. 

Add the prepared greens/raab to the pan and cook for about a minute, stirring several times to coat the greens/raab. Pour in the 1/4 cup water and cover the pan over the heat for 2-3 minutes (this will steam and cook the greens without burning them). Remove the lid and make sure the greens/raab are cooked to your desire, then stir the sausage back in along with a pinch of salt, pepper and the red pepper flakes. Remove from heat and serve with a small drizzle of olive oil and lemon juice if you want. 

If the raab mixture is still to bitter for you, add a bit of sugar or honey to balance out.

Raab Greens with Sausage | www.kettlercuisine.com

Thursday, April 3, 2014

Roasted Tomato and Okra with Southern Style Grits

I'm heading to Charleston, SC tomorrow - the epicenter of Creole and Southern cuisine!! Some of the best restaurants are found in Charleston, many of which are owned and run by James Beard-Award winning chefs! You might remember my last trip to the historic town.

Roasted Tomato and Okra with Southern Style Grits | www.kettlercuisine.com

I have had this recipe hanging around for a while and thought it was all too appropriate to post before my trip. Southern food and Charleston make me think of shrimp and grits! Grits are one of those staple Southern dishes. It's easy to tell if someone is from the South by asking if they like grits. If the answer is "No," or "What the heck is a grit?" then you know they aren't from 'round these parts :)

The Hubby, even though born in the Mid-West, has lived in the South for close to 15 years now, so he is accustomed to grits and the (true) Southern ways. His favorite are pimento cheese grits, which are amazing, especially when you use my Spicy Pimento Cheese

For this recipe, I started with the idea of Shrimp and Grits in mind and put my own spin on it....a.k.a. made it healthier! We usually like to serve it with Shrimp, but for those that aren't into seafood, this is pretty great without it too!

Later Ya'll!


Roasted Tomato and Okra with Southern Style Grits | www.kettlercuisine.com

Roasted Tomato and Okra with Southern Style Grits

Yields: 4 servings
Prep Time: 20 minutes
Cook Time: 35 minutes

Southern style grits
4 cups fresh okra, roughly chopped
3 cups cherry tomatoes (yellow or red)
2 tablespoon fresh basil or oregano, chopped
3 garlic cloves, minced
3 tablespoon olive oil
Salt and pepper to taste
1 tablespoon Grapeseed oil
1 small red onion, sliced
1/4 cup white wine or beer
cooked shrimp (optional)

Cook the Southern style grits per package instructions for 4 servings.


Preheat the oven to 375F. In a large bowl, combine the cherry tomatoes, okra, oregano, olive oil and garlic, then stir to coat the vegetables well. 

Line a large baking sheet with foil and spread the vegetables in a single even layer on the sheet. Bake in the oven for about 30 minutes, stirring halfway.

While the vegetables cook, caramelize the onions. Heat the Grapeseed oil in a small pan over medium heat, then add the red onion and cook, stirring frequently until they start to brown, about 15-20 minutes. Add in the white wine and continue to cook until most of the liquid has been absorbed. As you cook the onions, the sugars will release to brown and caramelize the onions.

To serve, scoop about a cup of grits into a bowl, layer the vegetables on top and garnish with the caramelized onions. Sprinkle with freshly chopped oregano or basil for added flavor. We like to add sautéed shrimp on top!

Sunday, February 9, 2014

Green Cleanse Juice

I am feeling empowered! I finally have my normal routine back. Well mostly. This broken foot situation pretty much put my life on hold for 2 months and continues to do so. I am proud to say I am finally out of the boot! I can drive myself to work, I can cook dinner and can finally start exercising again! I feel empowered!

Green Cleanse Juice

The feeling only grew when I heard "I'm Every Woman" by Whitney Houston on the radio. When I have this feeling, I love to eat healthy. And what is healthier than making a fresh juice?

I have an older juicer, but one that still does the trick. I made this juice when I was doing my Fall Cleanse and it gave me the energy boost that I needed in the morning, especially since caffeine wasn't allowed. Ever since the cleanse, I have decreased my caffeine intake immensely, not relying on it to wake me up in the morning. Instead I make juice when I have the time, which always starts my day off well.

Oftentimes I make a large batch on Sunday night for the start of the week. "They" say this isn't the correct way to juice. But seriously, who is "they" and how do they have the time to juice all day, every day! So, I am here to tell you that you can juice a day in advance.

Green Cleanse Juice

Don't let the greens in this juice scare you, the apple pulls it all together nicely, masking the bitterness of the kale and punch of the fennel. I know that not everyone has a juicer, but if you do, I highly recommend this blend. The apple provides multiple health benefits, while the fennel is a natural antioxidant and immune system booster. All around, this juice has wonderful flavors and more importantly, wonderful health benefits.


Green Cleanse Juice


Adapted from Tasty Yummies Fall Cleanse Green Juice
Yields: 1 serving
Prep Time: 5 minutes


1/2 small fennel bulb, trimmed of fronds
2 Persian cucumbers (or 1/2 regular cucumber)
1 large organic apple, skin included
1 cup fresh spinach or kale

Place all the ingredients into a high speed juicer and enjoy right away or store in an air tight container for up to 24 hours. The juice starts to loose the essential enzymes after a day, but still tastes delicious!

Tuesday, July 9, 2013

My Fancy Duck Egg Breakfast

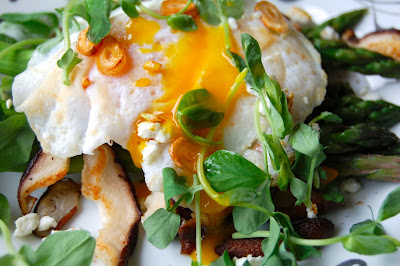
I was feeling fancy the other morning. I had just stocked up on delicious Farmer's market fare and started working on a recipe all morning. I quickly realized I had missed breakfast and peaked in the fridge to spot the duck eggs I had just purchased. One thing led to another, and I ended up with a new recipe!

My Fancy Duck Egg Breakfast | www.kettlercuisine.com

For the followers out there (or those that know me), this is a pretty typical Sunday morning. It usually takes me a few stops to gather all of the groceries for the week, then I stop to plan meals and make a list of what I can prep before the busy week starts. Somehow, my list always gets changed and I usually come out with a recipe to share....what I like to call "Sunday Fun Day!"

Ok, back to the breakfast. In a previous post, I talked about the exquisite taste of duck eggs - one of our absolute favorites! It's all about the yolk here. Not only are farm fresh duck eggs creamier and smoother than chicken eggs, but they are actually healthier too.

My Fancy Duck Egg Breakfast | www.kettlercuisine.com

Duck eggs have twice the amount of nutritional value than chicken eggs, containing more Omega-3 which is linked to improving brain function, skin and reducing inflammation. 

Duck eggs also last longer since they have a thicker outer shell and are preferred by most bakers for cakes and pastries.

My Fancy Duck Egg Breakfast | www.kettlercuisine.com

Most importantly for me, duck eggs are alkaline, unlike acidic chicken eggs. I try to keep my body in balance with a healthy diet full of alkaline foods, which help fight off cancer cells.

The one drawback to duck eggs is the amount of cholesterol. If you have heart disease or high cholesterol in your family, I don't recommend adding them to your diet. However, if you are a healthy person, exercising regularly, then your body needs fat to produce energy, which means duck eggs are back on the menu! 

My Fancy Duck Egg Breakfast

Yields: 1 serving
Prep Time: 10 minutes
Cook Time: 5 minutes

6-8 asparagus spears, trimmed
1 T grapeseed oil (or olive oil)
1 garlic clove, thinly sliced
3 shitake mushrooms (or favorite mushrooms), sliced
1 duck egg (or regular egg)
salt and pepper
micro greens or spinach for garnish
goat cheese for garnish
hot sauce (optional)

Steam asparagus spears after trimming.

In a small saute pan, heat the oil and fry garlic slices until you get fragrant oil and garlic chips. Be careful not to burn the garlic slices. Remove the slices from the oil and set aside on a paper towel lined plate.

Add in the shitake mushrooms to the garlic-infused oil and saute for 3-5 minutes. Move the mushrooms to the outside of the pan and crack the egg into the center. Fry the duck egg to desired doneness (we like dippy centers).

Assemble the fancy breakfast by laying the asparagus on a plate, then sautéed mushrooms on top, followed by the fried duck egg. Garnish with goat cheese, micro greens, salt, pepper, garlic chips and a little hot sauce.

My Fancy Duck Egg Breakfast | www.kettlercuisine.com

Thursday, March 28, 2013

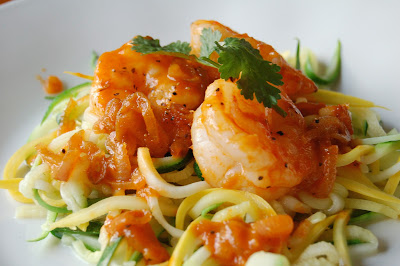
Sriracha Shrimp with Zoodles

Ok, get ready folks, for a blow-your-mind awesome dish. Apparently I have a thing with making vegetable noodles lately (spaghetti squash noodles). I have to give credit to my mom on this one though, she came across a recipe that spiraled zucchini to resemble spaghetti noodles. We rolled with this and started coming up with different ways to incorporate the now-called "zoodles."

Sriracha Shrimp with Zoodles

Gluten Free Can Be Done

When is the warm weather going to get here!! I love fall and winter produce, but I am ready for green and a change of ingredients. Since I am so impatient, I am going to start posting some recipes so when the produce starts popping up, we will be ready to cook!

Dishes like this one make gluten free very doable. I was so worried that when I made the decision to cut out gluten from my diet that I was going to have to either cook two meals, or eat carrots and celery for dinner while I drool over Ryan's pasta with clam sauce! 

Despite my fears, my brave husband came to the rescue and agreed to try anything I would be willing to make (within reason of course). And BAM!! A new compromise was born in the Kettler Kitchen...coming up with new gluten free recipes that Ryan will enjoy. 

Zucchini Noodles

The only tricky step is making the zucchini noodles, or "zoodles." However, there are several tools (across all price ranges) that make this much easier:


Besides being quick, healthy and gluten free, the leftovers can easily be turned into tacos! Who doesn't love shrimp tacos?!?! The recipe could actually start out as spicy shrimp and zucchini tacos using corn tortillas, and no one would even pay attention to the gluten free status.

Sriracha Shrimp with Zoodles

Sriracha Shrimp with Zoodles (with Taco Option)

Yields: 4 servings
Prep Time: 20 minutes
Cook Time: 10 minutes
Adapted from Kitchen Confidante: Spicy Shrimp with Zucchini Noodles recipe

6 medium zucchini or yellow squash
1 tsp salt
1 lb shrimp, peeled and deveined, tails on
1 T olive oil
1 shallot, finely sliced
2 T sriracha sauce
1 T tomato paste
1 tsp brown sugar
2 T butter
salt and pepper
fresh basil, thinly sliced
Turn them into tacos:
corn tortillas
avocado, sliced

Prep all ingredients before starting as this recipe goes quickly!

Julienne the zucchini into very thin strands like noodles. It is easiest to do this with a mandolin or spiraling tool. If not, a $10 julienne slicer does the trick also. Try to avoid using the seeded center of the zucchinis as they don’t hold up as well. Lay the “zoodles” out on paper towels and sprinkle with about 1 teaspoon of salt.

Boil a large pot of water and add in a pinch of salt. Blanche the zucchini noodles for 1 minute, reserve 1 cup of the water and drain water and noodles quickly. 

In a small bowl, mix the Sriracha, tomato paste, brown sugar, salt and pepper together. 

Warm the olive oil over medium heat in a large saute pan. Saute the shallots until just translucent and stir in the Sriracha mixture. Add in the prepared shrimp and saute for a few minutes until barely pink (careful as the Sriracha mixture will pop in the hot pan). Stir in the butter and ⅓ cup reserved water and stir until the butter has just melted and creates a sauce. Place the shrimp on top of the zucchini noodles on each plate and top with the pan sauce. Garnish with fresh herbs.

Sriracha Shrimp with Zoodles


Turn them into tacos!

Warm the corn tortillas slightly in the microwave and place zucchini noodles on the tortillas, avocado slices, 2-3 shrimp and drizzle with pan sauce. Top with favorite cheese or plain Greek yogurt.

Thursday, March 21, 2013

Spaghetti Squash with Meatballs

More than half my family is now eating gluten free. Yes, we are a family full of autoimmune diseases and GI disorders! Mom has been gluten free for over a year and doing well, then my brother started a gluten free diet about a month ago. In just that short amount of time, he has seen a drastic change with his health, for the better. 

Going Gluten Free

I made a conscious effort at the beginning of the year to cut out gluten, and can now say I have done this entirely. Yes, this sucks! I miss pizza and beer and biscuits, even Ezekial bread. But gluten has been scientifically linked to inflammation in the body. Considering Crohn's causes inflammation in the gut, I thought this would be an appropriate diet to try.  

Spaghetti Squash with Meatballs

Eating gluten free is actually not that difficult. I have already (inadvertantly) posted many recipes that fall into this category. Check out my new Gluten Free Recipe page in the navigation bar. I will be sure to add in more tips and tricks as I go along with this blog, but don't worry, I will still be posting the good stuff (i.e. recipes full of gluten)!!!

Spaghetti Squash with Meatballs

For my first "official" gluten free recipe, I thought I would post a fun and easy one...spaghetti squash with meatballs. A great substitute for the Italian comfort food, but with a lot more health benefits. I usually roast a few spaghetti squashes at a time, so I can have leftovers as an easy veggie side dish.

Spaghetti Squash with Meatballs


Spaghetti Squash with Meatballs

Serves: 2
Prep Time: 5 minutes
Cook Time: 45 minutes


1 3-4lb spaghetti squash, cut in half lengthwise

Favorite sauce (store bought or homemade)
Favorite meatballs (store bought or homemade)

Preheat the oven to 425F and line a baking sheet with parchment paper. Remove the seeds from both halves of the squash by using a metal spoon and scraping them out. I usually discard the seeds because I never have time to do anything with them.

Place the halves cut-side down on the baking sheet and roast for 45 minutes or until very tender. Turn the halves over to release steam and let rest for about 10 minutes.

Using a fork, scrape the flesh out of the skin into noodles and serve right away or keep in the refrigerator for up to a week.

Spaghetti Squash with Meatballs

Friday, March 15, 2013

Seaweed Salad

This post is for my girl Virginia! She loooooves sushi and is not afraid to admit it. I don't even ask anymore where we are meeting for lunch or dinner because she has usually set her mind to sushi. One of our staple sushi accouterments is seaweed salad. I love it and always order it prior to whatever raw-fish roll I am in the mood for. 

Seaweed Salad


Seaweed is Good For You


Thinking about seaweed brought a grimace to my face, thinking back on all the times my brother used to find it on the beach and throw it at me. Talk about getting an instant scream! So how is it that seaweed salad has become such a popular side dish in America? Well, we aren't the first to pick up on the salt-water-dwelling algae. Like most foods, trends and recipes, we "borrow" ideas from other cultures. The Chinese and Japanese have included sea vegetables in their diets and medicinal remedies for centuries. And rightly so, seaweed is FULL of essential vitamins and minerals. 

Seaweed Salad

Therefore, one would think this is a healthy side dish to order while at a sushi restaurant, but apparently not all healthy. Much like many wonderful things, it has a defect....too much sugar and sodium. Beware of what you are about to read....seaweed salad can have as much as 1200mg of sodium in a serving!! Esh....that is definitely most of the suggested daily intake and probably the reason for major bloat after eating it.

Seaweed Salad

When I was shopping in Trader Joe's the other day, I came across one of their new items - dehydrated seaweed salad. I didn't like the dressing that was included, so I threw it away and created my own version, further controlling the amount of sugar AND sodium. Even better, my dressing is gluten free!! So here is to having your cake (or seaweed) and eating it too!! Enjoy Virginia :)


Seaweed Salad

Yields: 2 cups salad
Prep Time: 10 minutes

1 package of Trader Joe's Dehydrated Seaweed Salad (discard dressing) or 30 grams mixture of dried seaweeds (nori, wakame, etc)
1 T toasted sesame oil
1 T low-sodium Tamari (or soy sauce if gluten is not an issue)
1 T sake (optional - Trader Joe's usually has it)
1 T rice vinegar
1 tsp honey
1/4 tsp red pepper powder or flakes

Suggested toppings:
sesame seeds, toasted (white or black)
cucumber, thinly sliced
scallion, finely chopped
radish, thinly sliced
avocado, diced

Follow the instructions for re-hydrating the seaweed (unless you have fresh, then just rinse and drain). For the Trader Joe's package, soak the seaweed in water for 7-10 minutes.

Seaweed Salad
Dehydrated
Seaweed Salad
Rehydrated
In a small bowl, whisk all dressing ingredients together and adjust the honey and red pepper powder to taste. Then pour over the seaweed, serve with desired toppings and enjoy!

Saturday, February 2, 2013

Powerberry Green Smoothie

If you haven't heard, juicing and smoothies are all the rage right now. Several of the food blogs I follow have mentioned either a juice fast or smoothie craze since the New Year. Why shouldn't they? Juicing and smoothies are a great way to sneak in raw vegetables that are essential for a daily diet. I am usually not one of those "jump, how high" kind of girls, but I had to give it a shot.

Powerberry Green Smoothie

Plain Ole' Blender

Since we don't have an $800 Vitamix or juicer, I had to experiment with my Cuisinart blender that we received as a wedding gift (thank you, Becky)!! I have to say, it is pretty dang powerful and does the job perfectly. I wanted a smoothie that contained a good amount of raw vegetables, but hidden under a mask of sweet fruit taste. After many attempts, and a few rough breakfast smoothies to take down, I resulted with the below recipe. 


Powerberry Green Smoothie

I first experimented with frozen fruits and refrigerated raw vegetables. By using frozen fruit, there is no need for ice cubes which can water down the taste. A frozen banana is a great secret tip for a creamy, smooth texture. We usually buy a bulk of bananas at the store since we eat them a lot. Freezing bananas are a great alternative for keeping almost too-ripen bananas. Simply peel, wrap and freeze for future smoothies!


30-Day Shred

This smoothie, along with some of my other healthy habits, have all come at a great time. Today, is the start of a 30-day shred with my friend, Virginia! 

I have not been running or exercising like my normal self since the marathon. Something about running 26.2 miles just makes your body want to stop for a while. But my dear friend Virginia is starting Jillian Michael's infamous 30-day Shred today! Every day of February, we are going to do one of Jillian's 30 minute workouts. Day 1 successfully completed!


Powerberry Green Smoothie

Serves: 1
Prep Time: 5 minutes

1 organic banana (preferably frozen)
1 cup frozen whole organic blueberries
1 cup almond milk (or regular milk)
1 organic pear, quartered
small handful of fresh spinach (optional)
1/2 medium cucumber or 1 small one, halve
1 Medjool date, pit removed (or 1 tsp honey)
1 tsp chia seeds

Place the banana and blueberries into a blender and pulse until it starts to break down. Add in the milk, pear, spinach, cucumber and date and blend until well combined and smooth. Quickly add in the chia seeds, pulse 2 times and serve immediately.

Powerberry Green Smoothie

Additional Notes:
 - Honey or maple syrup (Grade B) is a great substitute for the Medjool date. I usually always have dates in my kitchen for the Raw Brownies.
 - This smoothie can easily accommodate any type of frozen fruit or vegetables, depending on the power of your blender. Since I don't have a super, subsonic speed one, I tend to stick with softer fruits and vegetables.

Monday, January 21, 2013

Crunchy Nut Granola

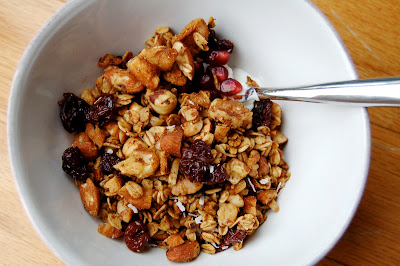
Granola is the best! I used to think it was so healthy until I actually read the ingredients and nutrion label on many store bought brands. I was amazed at how much sugar and random ingredients were in the granola. Since sugar is a trigger for my flare ups and I like to eat granola, we set out to make our own! Granola is not as hard as it looks to make. I featured a pumpkin granola during my Pumpkin Recipe Roundup in October last year.

Crunchy Nut Granola

Personally, I could eat pumpkin granola every day, but Ryan likes a bit of variety outside pumpkin season and most people aren't as obsessed with pumpkin as I am. So we set out to create a basic granola recipe that was versatile enough for everyone! 

When I say "basic granola recipe," I mean that the measurements and cooking temperature and time won't change, but the ingredients are easily substituted based on your tastes.

Crunchy Nut Granola


Nuts and Seeds

As long as you have 2 cups of nuts and seeds total, this will be a good ratio to the oats. I like to start with raw seeds and nuts because they contain more nutrients and toasting myself adds a nice flavor and aroma to the granola (not to mention makes your house smell amazing)! There are a variety of nuts and seeds to add in, and I usually change the mixture every time I make this. If you have a Trader Joe's near you, they have very reasonably priced raw nuts and seeds. Here are some suggestions:
  • almonds
  • hazelnuts
  • cashews
  • walnuts
  • pistachios
  • pecans
  • pepitas (pumpkin seeds)
  • sunflower seeds
  • flax seed
  • chia seeds (added at the end after cooking)

Sweetener

I don't like a very sweet granola, so the basic recipe is not sweet. However, honey or agave nectar can easily be added to the applesauce mixture for more sweetness. Start with 2-3 tablespoons and increase from there. Sweetened applesauce can also be used instead of unsweetened, just make sure to use organic so you aren't adding in any unnatural sweeteners. 

If molasses is not a desired taste, this can be substituted with brown sugar, honey or agave nectar. We like the earthy flavor of molasses in this granola though.

Crunchy Nut Granola

Last Minute Additions

After the granola cooks, I usually like to add in some different textures like dried fruit, chocolate or coconut flakes. For dried fruit, I like to use a combination of tart cherries and currants, however, I have added dried cranberries, apples, raisins and apricots in the past. All have been delicious!

Coconut is another addition that can easily be left off. This is one of the most fought over ingredients in our kitchen. Ryan despises the taste of coconut and can even taste coconut oil in my cooking. I tend to add in the coconut last so that I can make half the recipe without it for him.Chocolate chips or chunks could easily be added to this recipe as well to sweeten up the mix.

Even though we have perfected this gluten-free granola, our next kitchen experiment is a grain-free granola! Enjoy and let me know what your favorite flavor combinations are!


Crunchy Nut Granola


Crunchy Nut Granola


Makes: 8 cups
Prep Time: 20 minutes
Cook Time: 10 minutes + 25 minutes

5 T olive oil or grapeseed oil
1 tsp salt
1/4 tsp ground nutmeg
1/4 tsp ground cinnamon
1/4 c molasses
1/2 c unsweetened applesauce
1 tsp vanilla extract
1/4 tsp almond extract
4 c old fashioned oats (use gluten free if available)
2 c raw nuts and seeds (mixture of walnuts, almonds, hazelnuts, pepitas, sunflower seeds, cashews)
1 c dried fruit (cranberries, currants, cherries, apples)
1/2 c unsweetened shredded coconut (optional)
1/4 c honey (optional)

In a large saute pan, toast the nuts and seeds until fragrant and lightly browned. Be careful not to burn them (they will burn fast)! This took about 5 minutes over medium heat, stirring frequently. Set aside to cool.

Toasting Raw Nuts

Preheat the oven to 350F and line a large baking sheet with sides with aluminum foil or parchment paper.

Once the nut/seed mixture is cooled, roughly chop them in a food processor or by hand.

In a large bowl, mix the (honey if using) oil, salt, nutmeg, cinnamon, molasses, applesauce, vanilla extract and almond extract until well combined. Stir in the oats and the chopped nuts and seeds. The granola will be slightly moist, this is good.

Evenly layer the mixed granola onto the baking sheet and bake for about 25 minutes, stirring after 10 minutes. When stirring, there should be steam that escapes, this is good and helps make the granola crispy. Remove from the oven and allow to cool completely. Stir in the coconut flakes and dried fruit and store in an air tight container for up to one month.