Saturday, March 30, 2013

Easter Macaroon Thumbprints

Breathtaking. Have you ever just stopped to take in beautiful scenery and thought to yourself, "just breathtaking." Most often cameras can't capture these moments, but I tried this morning.

Easter Macaroon Thumbprints

I am sitting here at my parents kitchen table in the mountains at 7:05AM looking out at the most beautiful sunrise. I usually love to sleep in on Saturdays when I am not running, but something got me up early this morning so that I could come out and watch the sun come up. In the winter, the trees are bare, and we have the most amazing view of mountain landscape. Perfect for early sunrise watching :) I often find myself doing this at the beach as well, my body clock just wakes up and grabs a camera. 

Easter Macaroon Thumbprints

Easter Baskets

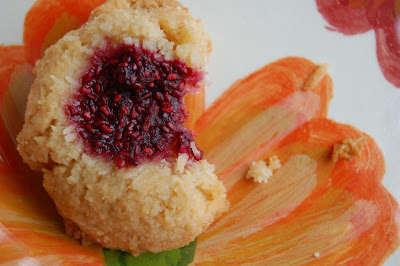
After the mini photo shoot, I grabbed something sweet! I made Coconut Macaroon Thumbprints with Raspberry Chia Seed Jam from Oh She Glows for Easter and my Mom's birthday. They were delicious and the perfect Easter "basket" for my gluten free belly :)

Easter Macaroon Thumbprints

I didn't have coconut butter, so just used regular butter instead, and they were still fantastic. I also reduced the amount of maple syrup in mine since I don't like them as sweet, but that is all personal. I made the raspberry chia seed jam ahead of time, so that I could throw the cookies together very quickly. They take a long time to cook, but only about 5 minutes to prepare.

The recipe yielded about a dozen cookies and plenty of leftover jam, which I have been enjoying in smoothies!

Easter Macaroon Thumbprints

I also conversed with Angela at Oh She Glows and she informed me that the jam could be made with any fruit really, it just might need a quick run through the food processor before adding on the cookies. Chia jam - what a great idea Angela!

Hop on over to Oh She Glows for the Coconut Macaroon Thumbprints with Raspberry Chia Seed Jam. They are the jam :)

Happy Easter!


Easter Macaroon Thumbprints

Thursday, March 28, 2013

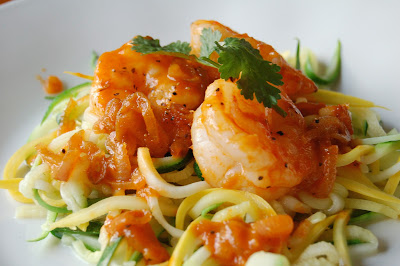
Sriracha Shrimp with Zoodles

Ok, get ready folks, for a blow-your-mind awesome dish. Apparently I have a thing with making vegetable noodles lately (spaghetti squash noodles). I have to give credit to my mom on this one though, she came across a recipe that spiraled zucchini to resemble spaghetti noodles. We rolled with this and started coming up with different ways to incorporate the now-called "zoodles."

Sriracha Shrimp with Zoodles

Gluten Free Can Be Done

When is the warm weather going to get here!! I love fall and winter produce, but I am ready for green and a change of ingredients. Since I am so impatient, I am going to start posting some recipes so when the produce starts popping up, we will be ready to cook!

Dishes like this one make gluten free very doable. I was so worried that when I made the decision to cut out gluten from my diet that I was going to have to either cook two meals, or eat carrots and celery for dinner while I drool over Ryan's pasta with clam sauce! 

Despite my fears, my brave husband came to the rescue and agreed to try anything I would be willing to make (within reason of course). And BAM!! A new compromise was born in the Kettler Kitchen...coming up with new gluten free recipes that Ryan will enjoy. 

Zucchini Noodles

The only tricky step is making the zucchini noodles, or "zoodles." However, there are several tools (across all price ranges) that make this much easier:


Besides being quick, healthy and gluten free, the leftovers can easily be turned into tacos! Who doesn't love shrimp tacos?!?! The recipe could actually start out as spicy shrimp and zucchini tacos using corn tortillas, and no one would even pay attention to the gluten free status.

Sriracha Shrimp with Zoodles

Sriracha Shrimp with Zoodles (with Taco Option)

Yields: 4 servings
Prep Time: 20 minutes
Cook Time: 10 minutes
Adapted from Kitchen Confidante: Spicy Shrimp with Zucchini Noodles recipe

6 medium zucchini or yellow squash
1 tsp salt
1 lb shrimp, peeled and deveined, tails on
1 T olive oil
1 shallot, finely sliced
2 T sriracha sauce
1 T tomato paste
1 tsp brown sugar
2 T butter
salt and pepper
fresh basil, thinly sliced
Turn them into tacos:
corn tortillas
avocado, sliced

Prep all ingredients before starting as this recipe goes quickly!

Julienne the zucchini into very thin strands like noodles. It is easiest to do this with a mandolin or spiraling tool. If not, a $10 julienne slicer does the trick also. Try to avoid using the seeded center of the zucchinis as they don’t hold up as well. Lay the “zoodles” out on paper towels and sprinkle with about 1 teaspoon of salt.

Boil a large pot of water and add in a pinch of salt. Blanche the zucchini noodles for 1 minute, reserve 1 cup of the water and drain water and noodles quickly. 

In a small bowl, mix the Sriracha, tomato paste, brown sugar, salt and pepper together. 

Warm the olive oil over medium heat in a large saute pan. Saute the shallots until just translucent and stir in the Sriracha mixture. Add in the prepared shrimp and saute for a few minutes until barely pink (careful as the Sriracha mixture will pop in the hot pan). Stir in the butter and ⅓ cup reserved water and stir until the butter has just melted and creates a sauce. Place the shrimp on top of the zucchini noodles on each plate and top with the pan sauce. Garnish with fresh herbs.

Sriracha Shrimp with Zoodles


Turn them into tacos!

Warm the corn tortillas slightly in the microwave and place zucchini noodles on the tortillas, avocado slices, 2-3 shrimp and drizzle with pan sauce. Top with favorite cheese or plain Greek yogurt.

Monday, March 25, 2013

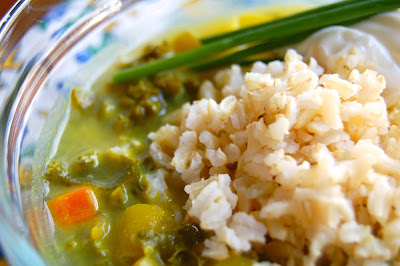
Healing Vegetable Soup

There is nothing worse than being sick, except maybe when your spouse is also sick. Ryan and I spent the better half of the nasty, rainy, cold weekend fighting coughs and colds. We certainly took it easy most of the weekend, but did muster the strength to whip up some home remedies to fight our illnesses.

Healing Vegetable Soup
Warm water with lemon and honey is my go-to for coughs and colds for several reasons. First, you need tons of liquids when you are sick to flush out all the crap in your system. Secondly, you need vitamin C to boost your immune system and fight the illness. The honey is just a nice addition to the warm water :)

Anti-inflammatory remedies are also very important for illness, especially for people with autoimmune diseases like Crohn's. I find the best way to accomplish this is with a Healing Vegetable Soup.
Healing Vegetable Soup

I like to add two essential anti-inflammatory ingredients to my soups when I am sick. Both of these should actually be incorporated into a daily diet - turmeric and cayenne.


Turmeric and Cayenne

Turmeric is a plant in the ginger family and usually presents itself in a bright orange-yellow powder form. It is a key ingredient in many Asian dishes and often used for medicinal purposes due to its anti-inflammatory properties. The active ingredient in turmeric is curcumin, which has been linked to fighting off colds and breaking down mucus congestion. I started taking turmeric/curcumin supplements about a month ago as another anti-inflammatory vitamin to help prevent my flare-ups. So far, so good!

Cayenne, a hot red chili pepper, is another wonder-spice that I always include in my daily diet. I actually have this in the morning with warm water and fresh lemon for a daily liver cleanse. Cayenne is also an anti-inflammatory spice that has many, many other health benefits. Check out this list of 17 Health Benefits of Cayenne Pepper. This also adds a bit of spice to the soup, which helps break up congestion.
Healing Vegetable Soup

Hopefully, you don't get a cold or cough, but if you do, there are many things you can do besides revert to DayQuil (which for me, never really works).

Ryan and I certainly are on the mend AND enjoying some delicious soup leftovers!!


Healing Vegetable Soup

Yields: 6 servings
Prep Time: 20 minutes
Cook Time: 30 minutes

2 shallots, thinly sliced
2 garlic cloves, minced
2 large carrots, peeled and diced
2 celery stalks, diced
2 T butter
½ tsp cayenne
½ tsp turmeric
½ dried Italian herbs
¼ tsp dried tarragon
salt and pepper
6 cups chicken broth (or vegetable for vegetarian version)
1 bay leaf
Parmesan rind
2 parsnips, peeled and diced (about 1 cup)
1 cup frozen peas (or snap peas, chopped)
Brown rice, cooked
Plain Greek yogurt for garnish
Fresh chives for garnish

Put on the brown rice to cook if not prepared already. 

Start by chopping all of the vegetables and aromatics. Warm a large soup pot over medium heat and melt the butter. Saute the shallots, garlic, carrots and celery for about 5-7 minutes or until starting to soften. Stir in the cayenne, turmeric, herbs, tarragon, salt and pepper and cook another 2 minutes until very fragrant. Pour in the chicken broth and add the bay leaf and Parmesan rind, then bring to a slight boil. Stir in parsnips and peas and cook for 15 minutes or until parsnips are cooked through and soft.

Healing Vegetable Soup

Serve with a small scoop of brown rice, yogurt and chives.

Thursday, March 21, 2013

Spaghetti Squash with Meatballs

More than half my family is now eating gluten free. Yes, we are a family full of autoimmune diseases and GI disorders! Mom has been gluten free for over a year and doing well, then my brother started a gluten free diet about a month ago. In just that short amount of time, he has seen a drastic change with his health, for the better. 

Going Gluten Free

I made a conscious effort at the beginning of the year to cut out gluten, and can now say I have done this entirely. Yes, this sucks! I miss pizza and beer and biscuits, even Ezekial bread. But gluten has been scientifically linked to inflammation in the body. Considering Crohn's causes inflammation in the gut, I thought this would be an appropriate diet to try.  

Spaghetti Squash with Meatballs

Eating gluten free is actually not that difficult. I have already (inadvertantly) posted many recipes that fall into this category. Check out my new Gluten Free Recipe page in the navigation bar. I will be sure to add in more tips and tricks as I go along with this blog, but don't worry, I will still be posting the good stuff (i.e. recipes full of gluten)!!!

Spaghetti Squash with Meatballs

For my first "official" gluten free recipe, I thought I would post a fun and easy one...spaghetti squash with meatballs. A great substitute for the Italian comfort food, but with a lot more health benefits. I usually roast a few spaghetti squashes at a time, so I can have leftovers as an easy veggie side dish.

Spaghetti Squash with Meatballs


Spaghetti Squash with Meatballs

Serves: 2
Prep Time: 5 minutes
Cook Time: 45 minutes


1 3-4lb spaghetti squash, cut in half lengthwise

Favorite sauce (store bought or homemade)
Favorite meatballs (store bought or homemade)

Preheat the oven to 425F and line a baking sheet with parchment paper. Remove the seeds from both halves of the squash by using a metal spoon and scraping them out. I usually discard the seeds because I never have time to do anything with them.

Place the halves cut-side down on the baking sheet and roast for 45 minutes or until very tender. Turn the halves over to release steam and let rest for about 10 minutes.

Using a fork, scrape the flesh out of the skin into noodles and serve right away or keep in the refrigerator for up to a week.

Spaghetti Squash with Meatballs

Tuesday, March 19, 2013

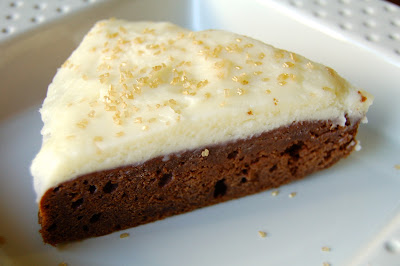
Red Wine Chocolate Cake for My 100th Post

Chocolate? Yes!
Red wine? Yes please!
Cake? Uhh...Yea!
100th post....YAY!

Red Wine Chocolate Cake for 100th Post

It is amazing to me that the food gods have allowed two things to happen:
  1. That chocolate, red wine and cake can come together in blissful harmony and 
  2. That I am able to keep up this blog in the midst of my busy life. 
Hard to believe that I have cooked, experimented with and written 100 posts!! Yay, go Kettler Cuisine!! 

100th Post on Kettler Cuisine

I was so excited when I noticed that I was approaching my 100th post that it was hard for me to decide on what to write about. One thing was obvious, write a huge THANK YOU! I have so much in store for all my followers, and can't wait to keep this blog going for many more posts. I can't express how grateful I am to many people in my life that encourage me, my love for cooking, and this blog. So thank you to my family, friends, and the culinary community for all your support. And what better way to say thank you, than with cake?

Red Wine Chocolate Cake for 100th Post       Red Wine Chocolate Cake for 100th Post

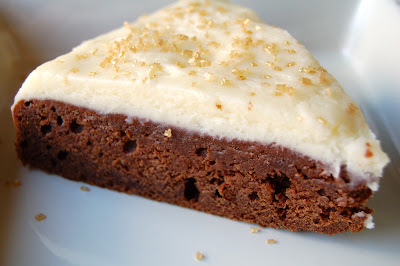
I've made Smitten Kitchen's Red Wine Chocolate Cake in the past and for some odd reason, waited an entire year to make it again. I DO NOT know why, for the life of me, I waited another year to try this recipe again because it is so easy and delicious!! My 100th post seemed like the perfect opportunity!

Red Wine Chocolate Cake for 100th Post

The website recipe for Chocolate Red Wine Cake is a bit different than the cookbook recipe, but they're both delicious! This has become my go-to cake for all occasions. Not only is this an extremely easy recipe, it gives a nice excuse to open a bottle of red wine. :)

Red Wine Chocolate Cake for 100th Post

So, raise your glass (of red wine or preferred libation) and cheers with me....Here's to many more posts on Kettler Cuisine! 

Do you have a favorite recipe? Do you have recipes you want me to write about? Email me or "like" me on Facebook and let me know.

Red Wine Chocolate Cake

Slightly adapted from Smitten Kitchen Red Wine Chocolate Cake 
Yields: 9-inch round cake
Prep Time: 20 minutes
Cook Time: 20-25 minutes
8 oz unsalted butter, room temperature
1 cup light brown sugar, lightly packed
1 egg + 1 egg yolk, room temperature
3/4 cup red wine (I use a Cabernet Sauvignon)
1/4 cup milk (any kind)
1 tsp vanilla extract
1 cup + 1 T all-purpose flour
1/2 cup raw cacao powder (or unsweetened cocoa powder)
1/8 tsp baking soda
1/2 tsp baking powder
1/4 tsp salt
1/4 tsp ground cinnamon
Favorite frosting or whipped cream to top - I like Mascarpone Frosting 

Preheat the oven to 325F and line the bottom of a 9-inch cake pan with parchment paper (I use a pencil to trace a circle around the cake pan on the parchment paper and cut the exact size). Butter and flour the sides of the pan and parchment paper well.

In a large bowl of a standing mixer, cream the butter until smooth, then add in the sugar and beat for about 3 minutes. Add the full egg and additional egg yolk and beat well. Add in the red wine, then vanilla and mix well. The batter might seem a bit uneven - no worries according to Smitten Kitchen (and Kettler Cuisine kitchen)!

Red Wine Chocolate Cake for 100th Post

Over a separate medium mixing bowl blend the flour, cacao, baking soda, baking powder, cinnamon and salt together. Pour into a sifter and sift about 3/4 of this mixture right over the wet ingredients. Then fold in the rest with a rubber spatula. Pour the batter into the prepared pan and bake for about 20-25 minutes. Test the cake (insert toothpick into the center, should come out clean) after 20 minutes. The cake will overcook fast, so watch it carefully!

Cool in the pan for 10 minutes, then carefully flip the cake out of the pan and cool the rest of the way on a cooling rack. Once the cake is fully cooled, dust with powdered sugar right before serving or serve with fresh whipped cream or Mascarpone frosting...and of course, a glass of red wine!

Red Wine Chocolate Cake for 100th Post

Friday, March 15, 2013

Seaweed Salad

This post is for my girl Virginia! She loooooves sushi and is not afraid to admit it. I don't even ask anymore where we are meeting for lunch or dinner because she has usually set her mind to sushi. One of our staple sushi accouterments is seaweed salad. I love it and always order it prior to whatever raw-fish roll I am in the mood for. 

Seaweed Salad


Seaweed is Good For You


Thinking about seaweed brought a grimace to my face, thinking back on all the times my brother used to find it on the beach and throw it at me. Talk about getting an instant scream! So how is it that seaweed salad has become such a popular side dish in America? Well, we aren't the first to pick up on the salt-water-dwelling algae. Like most foods, trends and recipes, we "borrow" ideas from other cultures. The Chinese and Japanese have included sea vegetables in their diets and medicinal remedies for centuries. And rightly so, seaweed is FULL of essential vitamins and minerals. 

Seaweed Salad

Therefore, one would think this is a healthy side dish to order while at a sushi restaurant, but apparently not all healthy. Much like many wonderful things, it has a defect....too much sugar and sodium. Beware of what you are about to read....seaweed salad can have as much as 1200mg of sodium in a serving!! Esh....that is definitely most of the suggested daily intake and probably the reason for major bloat after eating it.

Seaweed Salad

When I was shopping in Trader Joe's the other day, I came across one of their new items - dehydrated seaweed salad. I didn't like the dressing that was included, so I threw it away and created my own version, further controlling the amount of sugar AND sodium. Even better, my dressing is gluten free!! So here is to having your cake (or seaweed) and eating it too!! Enjoy Virginia :)


Seaweed Salad

Yields: 2 cups salad
Prep Time: 10 minutes

1 package of Trader Joe's Dehydrated Seaweed Salad (discard dressing) or 30 grams mixture of dried seaweeds (nori, wakame, etc)
1 T toasted sesame oil
1 T low-sodium Tamari (or soy sauce if gluten is not an issue)
1 T sake (optional - Trader Joe's usually has it)
1 T rice vinegar
1 tsp honey
1/4 tsp red pepper powder or flakes

Suggested toppings:
sesame seeds, toasted (white or black)
cucumber, thinly sliced
scallion, finely chopped
radish, thinly sliced
avocado, diced

Follow the instructions for re-hydrating the seaweed (unless you have fresh, then just rinse and drain). For the Trader Joe's package, soak the seaweed in water for 7-10 minutes.

Seaweed Salad
Dehydrated
Seaweed Salad
Rehydrated
In a small bowl, whisk all dressing ingredients together and adjust the honey and red pepper powder to taste. Then pour over the seaweed, serve with desired toppings and enjoy!